
-= Sharp Zaurus C1000 Linux Handheld PC =-
pdaXrom 1.1.0 Beta 3 Fixes + Customizations
---------------------------------------------------------
This page is a reference for me to keep track of tweaks, fixes, and alterations
I do to my C-1000 & a place to pool tips on making Beta 3 more stable.
My hope is that by gathering the fixes for many common problems in one
place - we will be one step closer to creating a final Stable point release
of the 2.4 kerneled pdaXrom system. Beta 3 is currently the last 2.4 release,
and marked as 'stable' for C-1000, C-3100, C-3200. All these fixes have
been tested on C-1000 and should work for all C-series. This page tries
to introduce pdaXrom in a way to ease the learning curve and frustrations
of learning the system for a new user.
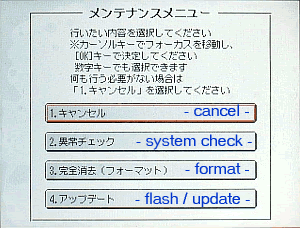
--------------------[Flash
pdaXrom]--------------------
A very good step-by-step install tutorial is available in OESF's
pdaXrom Wiki
The install process is the same for all 1.1.0 versions beta 1 ->
beta 3. Here are the key combos to enter the Boot and Service menus. You
must be plugged into AC power for this to work.
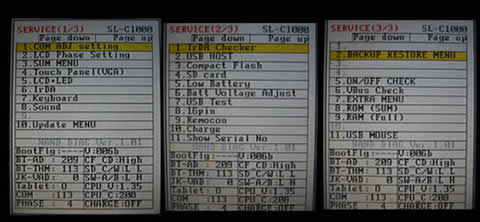
----------------[Reset
& Service Menues]---------------
There is a reset switch located under the removable battery panel
on the back of every zaurus. You can use the tip of the stylus to depress
the switch: It clears the useable memory (from a suspend) and reboots
the system.
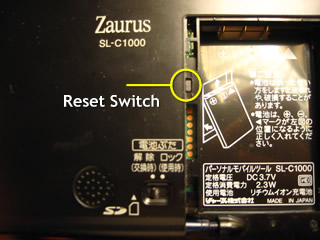
There are also special Key-Combos to Flash and Diagnose
[OK] + [Power] = Boot Menu (translation added to photo)
[D] + [M] + [Power] = Service Menu (English Diagnostic Menu)
[fn] + [D] + [M] + [Power] = Backup Service Menu
----------------------[Login & Passwd]-----------------------
At the log-in
prompt type root and the password is blank. I suggest you set
a password immediately. the command to set a root password is passwd
---------------------[Network set-up]-----------------------
The easiest way to setup your wireless network is to use the use the setup wizard. You can access it under System Tools -> Lan & Wifi. Or you can run
| # network.py |
By default beta 3 uses the hostap drivers. Some useful configuration commands are:
iwconfig
- configure wireless devices
iwevent
- display wireless event changes
iwgetid
- Report ESSID, NWID or AP/Cell Address
iwlist
- more detailed info than iwconfig
iwspy
- wireless stats
cardctl
- insert, eject, suspend, reset, a CF wireless card
dhcpcd
- query DHCP (specify interface ie- wlan0)
ifconfig
- configure network interface
-------------------[pdaXrom feeds]-------------------
The command to install packages is ipkg. You can install from SD/CF card, or over the network from the large free software repositories available. Beta 3 is not correctly configured with the proper feed directories on a first install. To fix this you need to add your feed addresses to ipkg.conf
# vi /etc/ipkg.conf |
You can also use the Package Manager to configure the feeds. There is a 'bug' on the input dialog, it will treat a space as a break. So if you title your feed like "official beta1" it will spit back an error in the log window. Do not use spaces, also feed addresses are CaSe-SenSiTIvE. The links on the pdaXrom page have not all been updated since the site migrated. I have provided links to the needed feeds in the column to the left. You should at least configure both the beta 1 & beta 3 feeds for Cxx0 & 7x-860. There are dependencies in each. RC11+ has depends for older apps -- and there are lots of fun things living in unstable & contrib
--------------[Super keys + key bindings]---------------
These are the default key bindings on a basic install. Check this post for more info.
[Fn] + [screen tap] = right-click
[Super Kanji key] - (next to Ctrl above address) = [Alt]
** Hold the Alt key to move windows that are drawn
off the screen **
[Alt] + [M] = Maximize / Auto resize window
[Ctrl] + [Alt] + [Del] = Shutdown X
[Ctrl] + [Alt] + [Left] = switch to last Virtual Desktop
[Ctrl] + [Alt] + [Right] = switch to next Virtual Desktop
[Shift] + [Alt] + [Left] = place window on last Desktop
[Shift] + [Alt] + [Right] = place window on next Desktop
[Ctrl] + [Alt] + [D] = hide windows
[Alt] + [Tab] = toggle between running apps
[Alt] + [Shift + [Tab] = toggle backward between running apps
[Shift] + [Home] = suspend
[Ctrl] + [Q] = kill window
[Tab] = Auto-complete in Terminal
loadkeys
- changes key mapping in console (use -s switch)
xmodmap
- utility for listing assigned keys (use -pk or -pke)
xev
- use to print key events to screen
/etc/x11/kb/akita.xmodmap + user.xmodmap are loaded in .xinitrc - You can edit these files with whatever key code events you want.
You can also use the Input Setup in System Tools to configure basic hotkeys - However there is a bug with this program. When it writes the kernel.map file, it breaks the [?.] key this only effects the basic shell (no X windows running)
----------[Fix .? keys outside of X - Input setup Bug]-----------
Everytime you run Input Setup your [?] key will break when you are outside of X. It will still work correctly within the X window enviroment, so you might have never noticed it. You'll need to edit the file if it happens to you: /etc/sysconfig/keyboard/kernel.map
keycode 65 = Tab
|
Once it is edited and saved to look like the above (hint, take out the null keys) the Z may need to be rebooted to read the new keybindings. (sometimes a loadkeys -s /etc/sysconfig/keyboard/kernel.map will work)
------------[Fix Zoom + Brightness keys]-------------
The default install does not have the [Fn] + [1,2,3,4] hot keys correctly set-up. This means you cannot zoom, or change brightness. [Fn] + [1,2] switches between SVGA 640x480 and VGA 320x240. [Fn] + [3,4] raises or lowers the brightness. This is handy to have in daylight, as full brightness is much easier to read. To bring this usability back you need to change the line in /usr/X11R6/bin/startx from -
| defaultserverargs=" -nolisten tcp" |
to ->
| defaultserverargs=" -nolisten tcp -kb" |
You can use vi from a command line, or leafpad from the display to edit. Save the file when you're done. Exit X, and when you restart X your [Fn] keys will work properly.
--------------[Transparent Aterm]--------------
rxvt is the default terminal in the X-window system. I prefer Aterm. Install it from the feed. Then to configure it for transparency ->
make a new file ~/.Xdefaults (/home/root/.Xdefaults)
| aterm*loginShell:true aterm*transparent:true aterm*shading:40 |
save file as .Xdefaults -- Make sure you use the leading period. This mean it's a hidden file. Use the command ls -al to view all hidden files in a directory. - the transparency option does not add overhead to the system. It is not true transparency it is simply extending the background image into the terminal window.
![]()
--------------[Rox Desktop Manager]-------------
by default there is no file-manager installed in beta 3. Matchbox is the default window manager, and it has a very PDA-ish feel. I like my Zaurus to have more power... Rox is lightweight, stable, and has an integrated file manager. Install Rox from the feed - then change the line in ~/.xinitrc (/home/root/.xinitrc) from
| eval "matchbox-desktop $MBBGND" 2>/dev/null >/dev/null & |
to ->
| eval "rox --pinboard=MYPINBOARD" & |
exit X - when you restart X you will be greeted with your new desktop. To create icons on the desktop, simply drag it from the application folder /usr/apps/ you can do the same with /mnt/card/ & /mt/cf/ there is a good mount, umount utility built into Rox.
There are many more window managers to choose from. Some of the most popular are XFCE, IceWM, and E17. None are as easy to set-up or as stable as Rox. But they have some pretty eye candy.
----------[Wallpapers + Backgrounds]------------
You can use any .png image as a background. pre-scaled 640x480 images work the best. Check the link to the left for Jedhead's theme site. I have also created a handful of wallpapers from Depthcore. To change a wallpaper in Matchbox, use the look 'n feel utility or run
| # looknfeel.py |
If you are using Rox : ) simply right-click the backdrop, and drag 'n drop
 |
 |
 |
 |
 |
 |
 |
 |
 |
 |
 |
 |
 |
 |
 |
 |
 |
 |
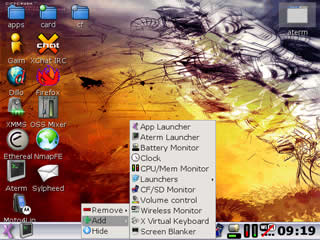
---------------[Personalize Panel]---------------
Like any desktop system you can add or remove links to programs and widgets to the panel. To do so hold the stylus against the very bottom edge of the screen. a small dialog will come up with options to add and remove. I suggest the wifi, mount, sysmon, and battery applets. You can also edit
| # leafpad /home/root/.matchbox/mbdock.session |
There are times that the panel may break. Suddenly all the icons and links will disappear. The easiest way to fix this is to simply re-add the needed applets.
---------------[Screenshots]---------------
The terminal command to take a screen shot with a wait of 5 seconds is ->
| # sleep 5; xwd -display :0.0 -root -out screenshot.xwd |
---------------[Configure Kismet]---------------
Install Kismet from the feed. You will need to create a new user to droppriv to
| # adduser zaurus # passwd zaurus |
Now you need to edit the configuration file /usr/etc/kismet.conf
Change the suid user to
| suiduser=zaurus |
change your capture source (may be different depending on your card)
| source=hostap,wlan0,linksys |
Kismet runs best without logging. If you want to log you will need to change the permissions of your user zaurus. to run without logging use the -n option.
| # kismet -n |
if you get errors (like ioctl failed 22:Invalid argument), you need to reset your card
| # cardctl suspend # cardctl scheme any # cardctl eject # cardctl reset # cardctl insert |
Once Kismet is running, use the [H] key to display the help and key mappings
---------------[Configure Wifi-radar]---------------
Install Wifi-radar from Jerrybme's feed. By default the app is configured to look for eth0 as the interface. This is for LAN + wlan-ng drivers. Since we're using the hostap, we need to edit /etc/wifi-radar.conf Change the line from
| interface = eth0 |
to
| interface = wlan0 |
---------------[USB Host + Client]---------------
The USB port on the back of the zaurus will accept any OTG compatible adapter. ie: it's not proprietary, any universal adapter will work. Some purchase the iRiver cable with their zaurus, but General Electric also makes a very cheap adapter kit. The easiest way to tell the difference is the color of the plastic in which the contacts are set. If it is white it is a Host cable. If the plastic around the connectors is black it is a Client cable.
in Client mode you can use the USB utility in System Tools to change between making the zaurus a serial device, a network device, or removable storage. You use the Client cable when you want to access the Z. ie, use it as portable storage between computers
In Host mode you can connect peripherals to the Z. Plus in a USB stick, data connect with a cell phone, external keyboard, etc... use the Host cable when you want your Z to access something external.
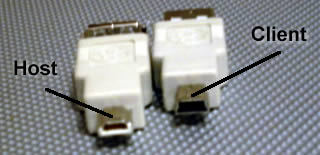
you can use lsusb to list the devices connected.
---------------[Setup SNES Emulator]---------------
The Zaurus is more then capable of running full system emulation. And nothing beats the stares ya get playing Donkey Kong Country on the subway ; ) You need to install the snes9x package from the unstable feed. You also need to install libstdcxx5-compat_5.0.7_armv5tel.ipk from the RC11+ feed. This is a dependency. snes9x works best when used from the terminal with no Xwindows running. since it uses SDL it will draw its own windows. if you've already got X running, you'll only get 1/2 size playback.
| # snes9x -nosound /mnt/card/snes/Donkey\ Kong\ Country\ \(V1.1\).zip |

Notice that spaces and special characters are proceeded by a backslash. The easiest way is to enter rom names is to use the [Tab] auto-complete. Here are the key bindings for snes9x:
[A] + [S] + [D] = high buttons
[Z] + [X] + [C] = low buttons
[space] = select
[U] + [I] = up
[H] = Left
[K] = Right
[M] + [N] = down
[Enter] + [ok] = start
[Dialpad] = up/down/left/right
[cancel] = exit
roms can be downloaded for free all over the net - however it is only 'legal' if you already own the cartridge for the original system.
---------------[Music Playback]---------------
pdaXrom comes with XMMS installed by default. This is an excellent music player which is essentially the linux version of winamp. Even the key bindings are the same.
[Z] = back a track
[X] = play
[C] = pause
[V] = stop
[B] = forward a track
[R] = repeat
[S] = shuffle
[L] = load track to playlist
[Shift] + [L] = load folder
[Ctrl] + [L] = load URL
[Alt] + [S] = skin browser
[Ctrl] + [P] = preferences
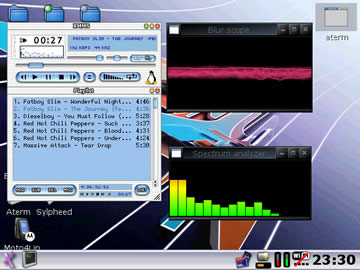
You can even apply skins to XMMS. Many can be found on the xmms website or through the debain skin package. untar the skins to /home/root/.xmms/Skins/
| # tar -xzvf that_skin_name.tar /home/root/Skins/ |
then you can select them by right clicking xmms and choosing the Skin Browser from the Options menu, or using the key command.
---------------[Movie Playback]---------------
You can watch movies in pdaXrom after you have installed the Mplayer
package. If you have a C1000, C3100, or C3200 you have bvdd playback.
With the correct options you can get full screen playback that isn't choppy
or distorted. Always install the newest version from the feed. (tested
with 1.0pre7_try2) - from the terminal type:
| # mplayer -vo bvdd -ac mad -ao ss -framedrop /mnt/card/SinCity.avi |
If you'd
like you can add the options to the config files at
/home/root/.mplayer/config
/usr/share/mplayer/mplayer.conf
If you want xmms to be able to play movies directly from the playlist, you will need to install the xmmsplayer package. It will then be available in the Input Preferences menu of xmms. Select it, and make sure the plug-in is enabled. It also gives the option of configuring xmmsplayer, or giving it a string of play options. By default it plays through X11, which creates a gtk window for the movie to play in.
-------------------[Fix Abiword]------------------
The default Abiword (2.4.2) that is pre-installed with beta3 has a problem when loading MS .doc's (! ie. it doesn't display them !). However Meanie has compiled an updated Abiword 2.4.4 version with the MS.doc fixed as well as hardcoded re-size so you don't have to use the auto window resize key combo. Additionally it allows you to open StarOffice and OpenOffice documents. Thanks! : )
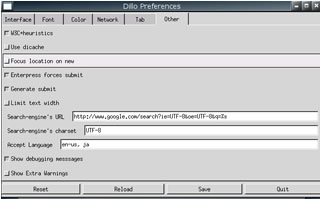
------------------[Configure Dillo]------------------
Dillo is the default web-browser in beta 3. It is quick, lightwieght, and generally works. To keep the browser window as minimal as possible, the config settings have thier own utility. This will allow you to change your homepage, cache size, encoding, user agent, proxy, etc...
| # dillocfg |
Dillo does not store cookies well, and does not always follow redirects correctly. So it can be difficult to use it with some web log-in forms or online authorization. For these items I suggest using Firefox. Firefox works very well after it has loaded, but it does take a very long time to load. If you're just surfing or checking news Dillo works best. However for those times when you need to authorize your machine (say at a wireless hotspot?) It is good to have a full featured web client. Firefox is in the beta 1 7x0+ feed.
---------------[Large SD card support]---------------
by default the mmc_pxa driver that comes with beta 3 only accepts cards 1 gig or smaller. You can use tetsu's altered sharp driver for support for larger cards (tested up to 4 gigs) You can download the driver from here: Zaurus SD driver update 1.0 tetsu arm.zip Unzip and install the ipk. Then change the following line in /etc/sdcontrol
from
| SD_MODULE=mmc_pxa |
to ->
| SD_MODULE=sharp_mmcsd_m |
Reboot and you now have full SD card support. (some brands are cranky still)
*there are some notes of the module crashing on shutdown. Simply re-insert the card, and things will be happy again* you may need to run sdcontrol if you have system stuff installed to SD.
---------------[SD card partitioning]---------------
I recently got a 4Gig Sd card! to make the most of the new space, I wanted to create 2 seperate partitions, one as vfat for storage, and one as ext2 to install gimp + other large programs. To start you need to use fdisk to create your new partition table for /dev/mmcda
# umount /dev/mmcda1 |
Notice you only specified the device, and not mmcda1 <- that's
because we're about to add multiple devices there. once in fdisk you'll
want to start by deleting the partition information that's already there.
This will erase everything, please backup.
| Command (m for help): d |
Now we want to create a new primary partition, I've
shown your choices in bold
Command (m for help): n |
I wanted to have my first partition larger than the rest, you can change the 1600 value to whatever you want. Now we create the second partition
| Command (m for help): n Command action p (for primary) 2 (to create the second primary) First cylinder (1601-2407, default 1301) 1601 Using default value 1601 Last cylinder or +size or +sizeM or +sizeK (1-2407): 2407 |
Now you should have both partitions created, you can use the print
option to view your partition table
| Command (m for help): p |
You'll notice that the ID and system information for each partition is
ID 83 - Linux. Next we create file structures with the type
option on these empty partitions.
| Command (m for help): t Partition number (1-4): 1 Hex code (type L to list codes): 6 Changed system type of partition 1 to 6 (FAT16) |
we don't need to set the type command on partition 2 because it is already created as type 83 - Linux (ext3) by default
Use the print option to re-view your partition information.
If everything looks as you want it to, then it's time to write
this partition information.
| Command (m for help): w |
next we make the filesystem on the partition. using the mkfs
command.
| # mkfs.msdos /dev/mmcda1 |
| # mkfs.ext2 /dev/mmcda2 |
our auto mount (fstab) will still mount /mnt/card to /dev/mmcda1 - this is the vfat partition that is used as storage. We need to make a new mount point and edit a few files to easily use our new ext2 partition. start by making the point.
| # mkdir /mnt/ext2 |
next we mount it
| # mount -t ext2 /dev/mmcda2 /mnt/ext2 |
We want this new partition to mount everytime we boot-up - so we will add it into /etc/fstab - open the file in leafpad and add this new line:
| /dev/mmcda2 /mnt/ext2 ext2 noauto, owner 0 0 |
Since we want this new partition to be installable through the package-manager we need to edit /etc/ipkg.conf as well. Add this line into your ipkg.conf
| dest ext2 /mnt/ext2 |
Now everything is good to go .. enjoy intalling huge programs on the C1000
: )
---------------[Fix 'wandering' pointer 7x0-860 only]---------------
This only seems to be a problem with some 7x0-860 users. As a note, beta
1 is considered stable on these units. While beta 3 is the stable version
for Cx00 users -- the 7x0-860 users should be aware that they may have
performance issues running beta3 instead of beta1. Here is how to fix
a common problem with the pointer response.
First we edit etc/sysconfig/clamshell/scripts.d/x11scr
| # leafpad etc/sysconfig/clamshell/scripts.d/x11scr |
change the line from reading "100" to "75"
| echo "100" >/proc/driver/w100/fastsysclk |
---------------[persistant home X86 live CD]---------------
Instead of running 'setup' once booting the live CD in your PC (which didn't work for me) simply copy the rootfs.bin to the root of a mountable FAT drive. (I have mine as hda5 on a USB disk). You can use PowerISO in windows or any other tool to extract directly out of the ISO file.
---------------===[
Thanks ]===-----------------
All this content came from somewhere. The community at
large is to be thanked ... but I would like to extend particular thanks
to Sash, Laze, Meanie, Jedhead, adf, Daniel3000, the OESF crew, devs,
ALL the Contrib!! and everyone who tries to teach in the forums
Main
- OESF
pdaXrom forum
- OESF
pdaXrom Wiki
- pdaXrom
Main
- pdaXrom
Community
- Beta3
Download install
pdaXrom feeds
- 1.1.0
beta 3 7x0-860
- 1.1.0
beta 3 Cxx0
- 1.1.0
beta 1 7x0-860
- 1.1.0
beta 1 Cxx0
- RC11
+
- Enlightenment17
wm
- pdaXrom
JP support
- pdaXrom
unstable mirror
- Meanie
Contrib
- zaurususer
XFCE plugs
- 2or0
Contrib
- Anunakin
Contrib
- Armagon
Contrib
- Daal
Contrib
- Desertrat
Contrib
- Dtruchan
Contrib
- Chero
Contrib
- Fabian
Contrib
- Iamphet
Contrib
- Jabbath
Contrib
- Jcabrer
Contrib
- Jerrybme
Contrib
- Pgas
Contrib
- Merli
Contrib
- Rgrep
Contrib
- Shmigol
Contrib
- Xromer
Contrib
- Zdevil
Contrib
-
Zumi Contrib
Misc
- pdaXrom
Screenshots
- themes
+ wallpapers
- tyrannozaurus
- OESF
links
- Z
General WiKi
IRC
irc.freenode.net
#cacko
#zaurus